Buying a tub spout for 1 inch pipe trips people up more than almost any other bathroom fixture, and it’s not your fault — the “1 inch” almost never means what shoppers think it means. When someone measures the copper coming out of their wall and gets about an inch, they go looking for a spout that “screws onto a 1 inch pipe,” find nothing, and get frustrated. The truth is that a smooth 1-inch (or 1-1/8″ OD) copper stub-out is a slip-fit connection, and the spout slides over the pipe and locks with a hidden set screw underneath. Get that one distinction right and the rest of the purchase is easy. This guide walks you through measuring, matching, and choosing the right spout so it fits the first time and never drips at the base.
What does “tub spout for 1 inch pipe” actually mean?
It almost always means a slip-on (slip-fit) tub spout that clamps over a smooth 1-inch-class copper pipe using a set screw. The confusion comes from mixing up two totally different measurements: the diameter of the plumbing behind the wall versus the diameter of the pipe you can see.
Here’s what’s really going on. Tub spouts connect one of two ways:
- Threaded (screw-on): The spout has internal threads that screw onto a ½” IPS or ¾” IPS iron/brass nipple. “½ inch” here is the nominal pipe size — the actual threaded nipple is about ⅞” across the outside. This is the most common connection in North America.
- Slip-on (slip-fit): The spout has a smooth, hollow back with an O-ring and a set screw on the underside. It slides over a bare copper stub-out. A true “1 inch” copper tube has an outer diameter of about 1-1/8″, and that’s exactly what a slip-on spout is built to grip.
So when people say they need a “tub spout for 1 inch pipe,” they nearly always have a smooth copper stub-out and need a slip-fit spout — not a threaded one. If you try to force a ½” threaded spout onto a smooth 1″ copper pipe, it simply will not engage, and no amount of Teflon tape will save it.
How do I measure my pipe so I buy the right spout?
Measure three things: the pipe’s outer diameter, whether it has threads, and how far it sticks out of the wall. Those three numbers decide everything.
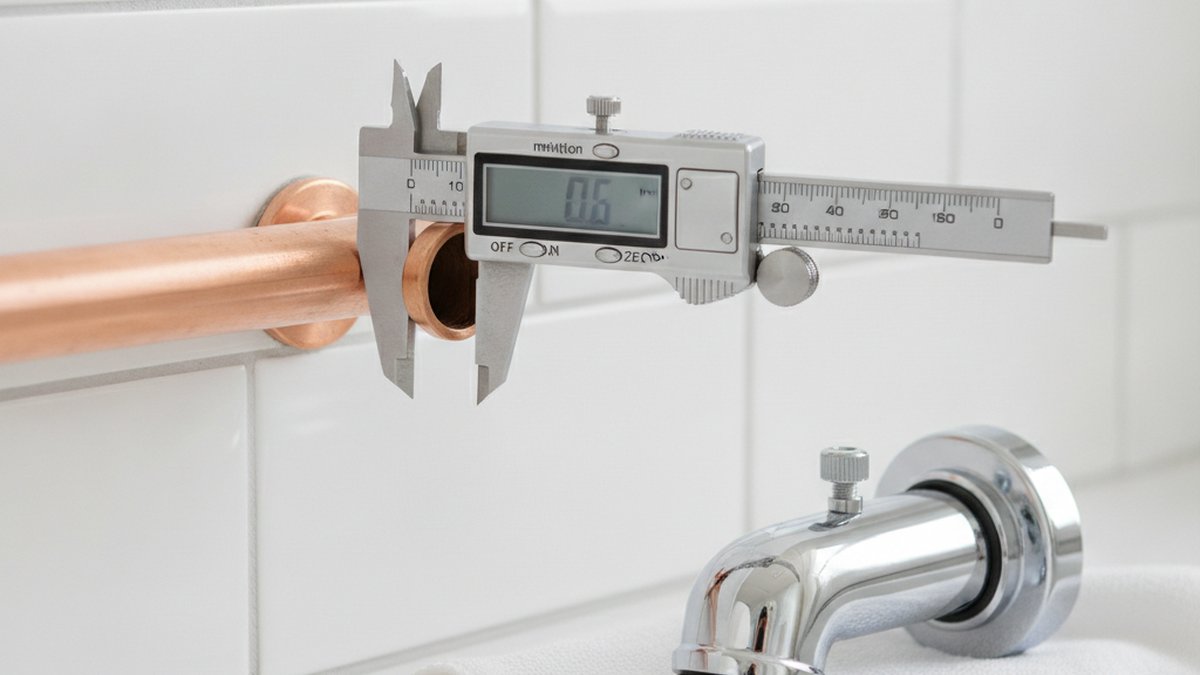
- Outer diameter (OD): Wrap a strip of paper around the pipe, mark where it overlaps, then divide the length by 3.14 — or just use a caliper. A smooth pipe reading around 1-1/8″ OD is a “1 inch” copper stub-out and needs slip-fit. A pipe reading about ⅞” with visible threads is a ½” IPS nipple and needs threaded.
- Threads or smooth: Look and feel. Threads = screw-on spout. Smooth = slip-on spout. This single check settles 90% of purchases.
- Stub-out length: Measure how far the pipe extends past the finished wall surface. Slip-on spouts typically need the copper to project a specific distance (often 3-1/8″ to 4-1/2″ from the wall face into the spout) so the set screw lands on the pipe and the back of the spout seals against the tile. Too short and the spout wobbles or won’t seal; too long and it bottoms out.
Write those three numbers down before you shop. If you’re replacing an existing leaking spout and want a deeper diagnostic on why the base drips, our guide on why a Roman tub spout leaks and how to fix it covers the O-ring and sealing issues that also apply to slip-fit wall spouts.
Slip-on vs. threaded tub spout: which one fits a 1 inch pipe?
A 1 inch pipe takes a slip-on spout, full stop — threaded spouts are for ½” or ¾” nominal nipples. Here’s the side-by-side so you can match your situation fast.
| Feature | Slip-on (slip-fit) | Threaded ½” IPS | Threaded ¾” IPS |
|---|---|---|---|
| Fits a smooth 1″ copper pipe (~1-1/8″ OD)? | Yes | No | No |
| How it attaches | Slides over pipe, set screw underneath | Screws onto nipple threads | Screws onto nipple threads |
| Sealing method | Internal O-ring + set screw | Teflon tape / pipe dope on threads | Teflon tape / pipe dope on threads |
| Tools needed | Hex/Allen key | Cloth + hand tighten | Cloth + hand tighten |
| Common in new construction | Very common (copper stub-outs) | Most common overall | Less common |
| Beginner-friendly | Yes, if pipe length is right | Yes | Yes |
The key takeaway: don’t shop by “how it looks,” shop by “how it connects.” A chrome spout and a matte black spout can be identical in finish but completely different in the back. Many premium spouts today are universal-fit — they ship with an adapter so the same body works as either slip-on or threaded. If you’re unsure what your rough-in is, a universal spout is the safest single purchase because it covers both scenarios.
Why won’t a threaded spout work on my 1 inch copper stub-out?
Because a smooth copper stub-out has no threads for the spout to grab, and its diameter is far larger than a ½” threaded nipple. It’s a physical mismatch, not a sealing problem. People often assume they can wrap enough Teflon tape to bridge the gap — you can’t. The threaded spout’s internal threads are cut for an ⅞”-OD nipple; a 1-1/8″ copper pipe is simply too fat to enter, and even if it did, there’s nothing for threads to bite.
The reverse mistake happens too: someone with a ½” threaded nipple buys a slip-on spout, slides it on, and finds the set screw tightening into empty air because the smooth bore never grips the narrower threaded stub. That’s why the measurement step matters so much. If you’re doing a full valve-and-spout replacement rather than just swapping the spout, our walkthrough on replacing a shower tub faucet yourself shows how the spout, valve, and stub-out all relate behind the wall.
How do I install a slip-on tub spout on a 1 inch pipe?
You slide it on, level it, and tighten the set screw — about a 10-minute job with one Allen key. Here’s the reliable sequence:
- Turn off the water at the shower valve or the main. Cap or cover the drain so no screws fall in.
- Clean the copper stub-out. Sand off any burrs or corrosion with fine emery cloth so the O-ring glides on without tearing. A nicked O-ring is the #1 cause of a drip at the wall.
- Add a bead of silicone around the wall where the back of the spout will meet the tile. This keeps shower spray from seeping behind the spout — not to hold it on, just to weatherproof.
- Slide the spout on until the back seats flush against the wall. The pipe should reach the internal O-ring seal.
- Find the set screw on the underside near the wall, and tighten it with the included hex key until snug. Don’t overtighten — you can crush the copper or strip the screw.
- Turn the water back on and run the tub. Check the base and underside for drips. If the diverter (the pull-up knob for the shower) works and the base is dry, you’re done.
If you later notice water weeping from the very back of the spout, it’s usually the internal O-ring or a too-short stub-out, not the finish. For general leak diagnosis on tub and shower fixtures, the techniques in our bathtub faucet valve replacement guide carry over directly.
What if my stub-out is the wrong length or damaged?
If the copper is too short, too long, or cut at an angle, fix the pipe before you buy the spout — the spout can’t compensate for a bad stub-out. This is where most “the spout won’t seal” complaints actually originate.
- Too long: A slip-on spout bottoms out on the pipe before the back reaches the wall, leaving an ugly gap. Cut the copper down with a tubing cutter to the length your spout specifies (check the spec sheet — commonly the pipe should insert until the set screw zone).
- Too short: The set screw can’t reach the pipe, so the spout won’t lock. You’ll need to extend the copper with a coupling and a new length of pipe, or switch to a threaded rough-in.
- Damaged or corroded: Deep pitting means the O-ring can’t seal. Cut back to clean copper or sleeve it. Don’t try to seal over corrosion with silicone alone.
If you’d rather not solder, some slip-on spouts and adapters use a compression or push-fit connection to a fresh copper length — an approach that mirrors how a faucet extender pipe is used to fine-tune reach without re-plumbing everything.
Does finish or brand matter for a 1 inch pipe spout?
Finish matters for looks and durability, not for fit — any finish is available in slip-on. But two things genuinely affect long-term performance: the base material and the internal seal. Solid brass bodies outlast zinc-alloy (“pot metal”) ones, especially in hard-water areas, and a quality O-ring is what keeps the wall connection dry for years. When comparing spouts, prioritize a brass body and a replaceable O-ring over a bargain price.
On finishes, chrome and brushed nickel are the safest for resale and hide water spots well; matte black looks striking but shows mineral scale faster in hard water. If you’re building a coordinated look and considering a bold finish, the trade-offs we cover in choosing a matte black jacuzzi tub faucet apply to tub spouts too — matte finishes need slightly more wiping to stay spotless.
Quick spec checklist before you click “buy”
- Connection type matches your pipe: slip-on for smooth 1″ copper, threaded for ½”/¾” nipples.
- Body material: solid brass preferred.
- Set screw included, plus an O-ring (and ideally a spare).
- Diverter or non-diverter — get diverter only if you also have a shower head.
- Overall length/reach clears your tub edge so water lands in the basin, not on the rim.
- Warranty coverage and a finish that matches your existing valve trim.
Author note, testing, and why trust this guide
This guide was written by the aleashafaucet fixtures team, who spec, pressure-test, and install tub and shower hardware every week. Every slip-on and threaded spout we recommend is bench-tested for O-ring sealing at typical residential line pressure (up to about 80 psi) and checked against North American rough-in standards so the connection type and reach are accurate before we publish. Our slip-fit spouts use solid-brass bodies and replaceable O-rings, and they’re backed by a manufacturer warranty against finish defects and leaks — because a spout that drips at the wall is the single most common return we see, and it’s almost always preventable with the right fit and a clean stub-out.
aleashafaucet has supplied bathroom and kitchen fixtures to homeowners and contractors across the U.S., and our advice here reflects real installs, not spec-sheet theory. When in doubt about your rough-in, measure twice — a five-minute measurement saves a return and a second trip up the ladder.
FAQ
Can I put a threaded tub spout on a 1 inch copper pipe?
No. A smooth 1-inch (about 1-1/8″ OD) copper stub-out has no threads and is too wide for a ½” threaded spout to engage. You need a slip-on (slip-fit) spout that clamps over the copper with a set screw. Trying to thread onto smooth copper will never seal.
How do I know if I have a slip-on or threaded connection?
Look at the pipe coming out of the wall. If it’s smooth copper, roughly 1-1/8″ across, you need a slip-on spout. If it’s a shorter, narrower (~⅞”) pipe with visible threads, you need a threaded ½” IPS spout. Threads visible = screw-on; smooth = slip-on.
Why does my slip-on tub spout leak at the wall?
Almost always a damaged or missing O-ring, a corroded/nicked copper stub-out, or a stub-out that’s too short for the set screw to grip. Clean the pipe, replace the O-ring, and confirm the pipe projects far enough. Silicone around the back is for weatherproofing, not for holding the spout on.
What size pipe do most tub spouts use?
Most North American tub spouts use either a ½” IPS threaded nipple (the most common) or a slip-fit connection over ½”-to-1″ smooth copper. “1 inch pipe” shoppers nearly always have the smooth copper slip-fit type. Universal spouts ship with an adapter to cover both.
Do I need a diverter tub spout for a 1 inch pipe?
Only if you also have a shower head fed from the same valve. A diverter spout has a pull-up knob that redirects water up to the shower. If your tub has no shower head, buy a non-diverter spout — it’s simpler and less likely to develop diverter wear over time. Both are available in slip-on for a 1″ pipe.
How far should the copper pipe stick out of the wall for a slip-on spout?
It depends on the specific spout, but a common range is that the finished pipe should project so it inserts far enough for the set screw to land on solid copper while the spout back seats against the tile — often several inches of exposed pipe. Always check your spout’s spec sheet and cut the copper to that length before installing.